Note: For this article, the improvements will work for Excel 2013. The pictures are from MO 365. If you need any extra Excel help, please feel free to email us at [email protected]!
You add one more column to a massive workbook and Excel slows to a crawl. Even if the spreadsheet doesn’t crash, it calculates so slowly that it’s almost unusable.
Bummer.
Although slow Excel workbooks are a normal part of an analyst’s life, they don’t have to be a common occurrence. Below I’ve outlined some best practices that will show you how to fix a slow Excel spreadsheet.
How to Work within a Slow Spreadsheet
Before speeding up a slow workbook, it’s important to know how to navigate within a slow workbook in the first place. Otherwise, every improvement you try to implement will cause the workbook to crash.
Excel doesn’t usually crash or slow down randomly. Most of the times I’ve had Excel crash on me it’s been in a large file due to:
- AutoRecover
- Pasting down new formulas
- Filtering
- Deleting/inserting rows or columns
Most of these actions are avoidable.
Disable AutoRecover
For large workbooks, consider disabling AutoRecover. Go to File > Options > Save > Disable AutoRecover for this workbook only. Yes, you lose the AutoRecover feature, but you also won’t risk the workbook crashing. Remember to save more often, of course.
Turn on Manual Calculations
For particularly large files, it helps to turn off AutoCalculations. Go to File > Options > Formulas > Manual > Uncheck Recalculate workbook before Saving.

Not only is it annoying to have Excel recalculate cells every time you change something in the workbook, but turning calculations to Manual also allows you to prevent Excel from calculating until you think it is safe to do so. You can calculate a sheet by hitting Shift + F9, or the whole workbook by pressing F9. In this way, you can make improvements first and then allow the workbook to calculate after you’ve made it smaller.
Paste as Values before Filtering
Filtering or Deleting/Inserting Rows and Columns causes Excel to recalculate the sheet. In a large workbook, deleting lots of cells can cause the file to crash.
If you must filter, consider copying the data and pasting it as values in a new workbook. Then filter the data as you would normally. Since the data was pasted as values, there are no formulas for Excel to recalculate and the data filter will be applied quickly.
Avoid Inserting/Deleting Rows or Columns until File Size Reduced
Although deleting rows or columns is a good way to reduce the size of a large workbook, try waiting until you have implemented some of the other improvements (discussed below) before deleting rows or columns.
How to Make Formulas Calculate Faster
Reduce Volatile Formulas
Excel doesn’t recalculate every cell of a workbook when you hit calculate. Instead, when you enter something new into an Excel worksheet, Excel goes through and marks which cells need to be recalculated as a result of the new input. It also marks cells that are dependent on those cells and so on. It then only calculates the marked cells when recalculating.
For some functions, however, Excel must recalculate that cell every time a new calculation is triggered and, therefore, every cell that is dependent on that cell. These functions are called volatile functions. Some popular volatile functions are INDIRECT, OFFSET, and TODAY.
As you can imagine, if a cell with a volatile function occurs early on in a long chain of thousands of dependent cells, volatile functions can significantly slow down a workbook.
In general, only use volatile functions when necessary or when they are towards the end of a chain of dependent cells in a workbook. The OFFSET function can usually be replaced by an INDEX function. INDIRECT can be avoided by keeping data all on one tab and adding a new column to the dataset to apply a label. For example, if you are using the INDIRECT function to gather data from 12 tabs labeled for each month, consider consolidating the data on each “Month” tab into one tab and add a column that labels the month for each row. For TODAY, you can change that cell to a user input.
Remove Arrays
Array formulas allow you to store a collection of answers in one part of your formula and then perform another calculation on those values. For example, array formulas can be used to calculate the equivalent of MAXIF or MINIF in earlier versions of Excel.
You can identify array formulas by the curly brackets that surround them: {}.

Although array formulas can produce calculations with less code than alternative formulas, in general, they cause Excel to calculate slowly and, in my experience, are usually the main culprit behind struggling workbooks. You can generally avoid using array formulas by spreading formulas across multiple columns or using an INDEX/MATCH function instead.
Order Conditions in Formulas Correctly
When you use functions like SUMIFS, COUNTIFS, or IF, the order of the conditions matters. List the most restrictive conditions first. For example, say you were trying to calculate the number of male and female staff members in each state from the table below:

If you wanted to count the number of female staff members working in Kansas you could write two formulas.
=COUNTIFS(A:A, “Kansas”, B:B, “F”)
Or
=COUNTIFS(B:B, “F”, A:A, “Kansas”)
The first formula, however, is faster than the second.
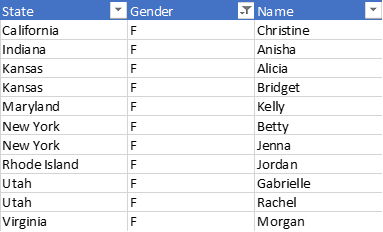
Excel evaluates each condition in order from left to right as they are written in the formula. It identifies the rows that meet each condition and then cycles through those rows again to see which of the rows meets the second condition. So in the first formula, Excel cycles through all 15 rows to pick out which rows have “Kansas” in column A. After checking for the first condition, it only has two rows left to check whether the employees are male or female:

In the first formula then, Excel evaluates: 15 rows for State Condition + 2 rows for Gender condition = 17 total rows.
In the second formula, however, Excel cycles through all 15 rows to see whether column B is “F.” It then has to cycle through 11 more rows to evaluate whether the column A is “Kansas.”
The second formula therefore evaluates: 15 rows for the gender condition + 11 rows for the state condition = 26 total rows.
Putting the more restrictive condition, the state, as the first condition limits the number of rows Excel needs to cycle through and makes the calculation time faster.
Now imagine if the number of rows in the dataset were 50,000 instead of 15. The condition order can make a dramatic difference in the number of rows Excel has to cycle through.
The same principle applies to nested IF statements. Put whatever condition will cause Excel to complete the IF statement first.
Don’t repeat calculations for the same value

The formula above calculates each department’s percentage of total revenue. Notice for the calculation, that the total revenue is calculated in each formula: SUM($B$2:$B$7). Instead, you can store that sum in a different cell and reference that cell in the formula.

This way, Excel only calculates the total revenue once instead of for each row in the table. Again, this is a small table for illustrative purposes, but imagine if the dataset were 50,000 rows. You would save Excel 49,999 calculations.
Other Ways to Fix Your Slow Excel Spreadsheet
Delete Unused Cells
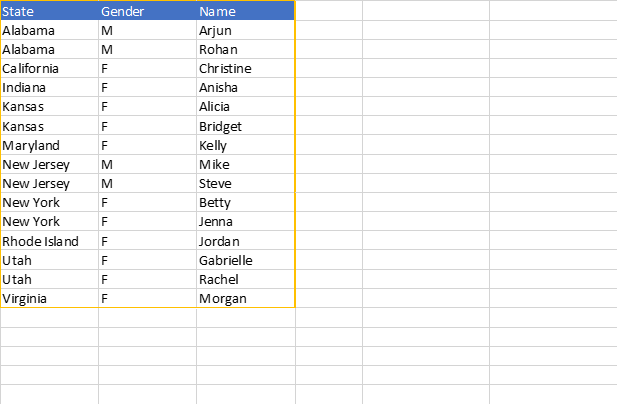
Even though you can see the cells of your spreadsheet, Excel only “activates” cells that have been used in the workbook. Only the table highlighted in gold is part of the “Active” cells in the spreadsheet:
When you extend formatting down to the bottom or right of a spreadsheet, you then activate all the cells with formatting, increasing the size of the spreadsheet. Even if you clear those cells, you only “deactivate” those cells by deleting their rows or columns.
You can check which cells are active in your spreadsheet by hitting Ctrl + End, which will take you to the furthest cell to the bottom and right of the spreadsheet that is active. In the example above, it would take you to the cell that says, “Morgan.”
If there are rows or columns that you don’t need that are activated, you can go ahead and delete them to reduce file size. You must save the file before you can see the drop in the Properties section of the Info tab:

Make the formula improvements first before deleting rows and columns to reduce the chance of crashing the file when you try deleting.
Filter Your Data Before It Ever Reaches Excel
Although this tip isn’t directly related to Excel, it is one of the most helpful for fixing slow Excel spreadsheets. Generally, one big error analysts make is pasting massive amounts of unneeded data into an Excel workbook. Depending on where you are getting the data, consider what you really need to put into Excel and try to filter out any unneeded rows before they even enter the workbook. For example, if you only need data for 2020, don’t dump in data from 2010-2019.
You can often link your Excel workbook straight to the database from which you are pulling data by going to the Data section of the top ribbon and entering information about your database:
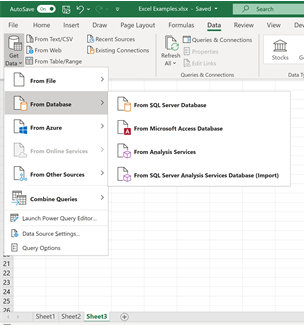
You can then use SQL to filter for the exact data you need, massively dropping the size of your spreadsheet.
Conclusion
If you follow these principles, you should be able to fix your slow Excel spreadsheet. Have any other tips you want us to add to this guide or need any extra help? Let us know: [email protected].