We’ve all been there. You delete a row in a big Excel workbook and suddenly the screen turns white and the workbook stops responding. Why does Excel crash when deleting rows, even if it’s just a row or two?
Excel crashes when deleting rows because deleting rows triggers a recalculation of the workbook. If the workbook takes up too many calculation resources, it will stop responding.
To fix the problem, you need to:
- Make your formulas more efficient
- Reduce the total number of formulas in your workbook
Learning how to make your workbooks smaller and more efficient is one of the crucial steps to becoming an Excel expert.
Excel Remaps and Recalculates Cells When Deleting Rows
Before we dive into specific fixes, however, it’s very important to understand how Excel performs calculations.
Excel does not recalculate every cell of a workbook every time you enter a new value somewhere on the spreadsheet.
Instead, Excel keeps a map of which cells are “dependent” on other cells in the worksheet. When you enter a new value, Excel only recalculates cells that depend on the cell you just changed.
If you change a cell at the beginning of the workbook that affects the value of many other cells, which in turn affects even more cells, the time it takes Excel to recalculate the workbook is long. When you change the value of a cell at the end of a workbook that doesn’t affect the value of any other cells, Excel will calculate much faster.
Structuring your formulas in a way that keep the amount of calculations Excel needs to perform to a minimum can stop your workbook from crashing when you delete rows.
Deleting rows is costly because it causes Excel to recreate the map of dependent cells and calculate everything over again. The more efficient your workbook, the less chance of a crash.
How to Stop Excel Crashes – Make Your Workbook More Efficient
To prevent a crash when deleting rows, try making your workbook more efficient. You can:
- Remove Arrays
- Restructure your formulas
- Avoid repeating calculations for the same value
Remove Arrays
Array formulas allow you to store a collection of answers in one part of your formula and then perform another calculation on those values. For example, array formulas can be used to calculate the equivalent of MAXIF or MINIF in earlier versions of Excel.
You can identify array formulas by the curly brackets that surround them: {}.

While array functions are very useful, they take up a lot of resources. If possible, remove them. For example, you can remove arrays for a MAXIFS formula (in older versions of Excel) simply by sorting your data.
If you must keep them, remove the brackets from your formulas to temporarily take away the arrays. Then delete the rows and add the brackets back in after the rows are deleted.
Restructure Your Formulas
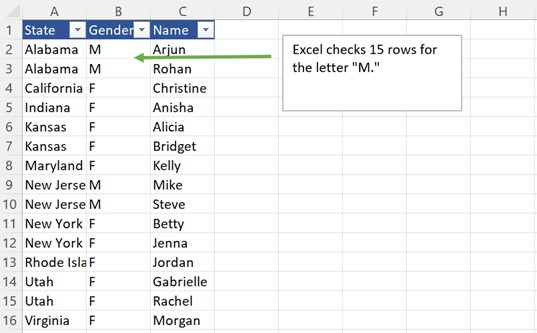
Let’s pose a question about the following table:
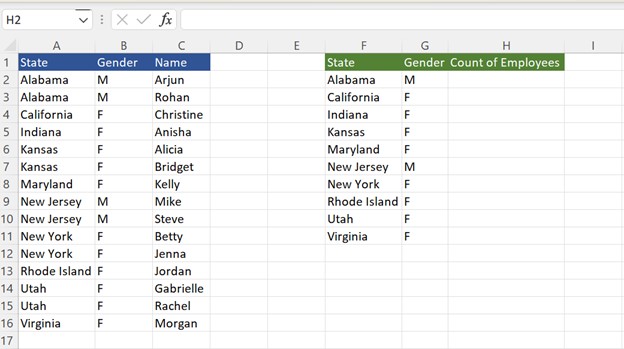
If I’d like to calculate the number of employees for each state and by each gender in the table, I can write COUNTIFS(A:A,F2,B:B,G2) or COUNTIFS(B:B,G2,A:A,F2) to produce the same result. Does it matter which way I write the formula?
Yes!
When Excel calculates a COUNTIFS (or SUMIFS) formula with multiple conditions it loops through each row in the table and eliminates the rows in the table that don’t meet the first condition. It then starts again and loops through the remaining rows that met the first condition and removes the rows that don’t meet the second condition. Finally, it counts the remaining rows.
Put the Most Exclusive Condition First in the Formula
If you put the most exclusive condition first in the formula, Excel eliminates most of the rows first and then only cycles through the smaller number of remaining rows, which makes it calculate faster.
Let’s look at the example again:

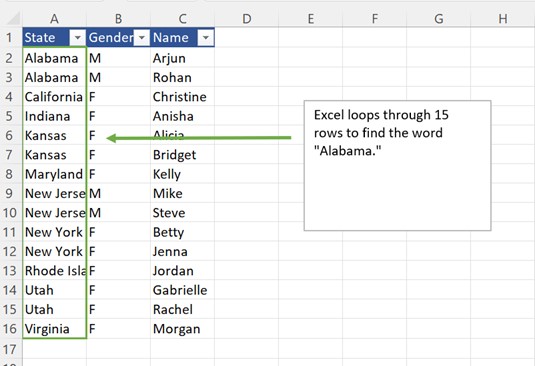
If we write the COUNTIFS in H2 like COUNTIFS(A:A,F2,B:B,G2), Excel will filter for the state first and then the gender of each employee. To find, Alabama, Excel must first check 15 rows. After finding the two Alabama rows, Excel then checks those remaining two rows to find the “M” rows. For this formula, Excel checks a total of 17 rows.
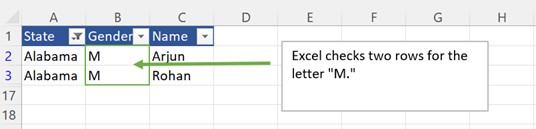
If we write the formula COUNTIFS(B:B,G2,A:A,F2), Excel checks for the gender first, and then the state. It checks the 15 rows for gender, and then loops through another 4 rows to find the letter “M.” For this formula, Excel checks a total of 19 rows.
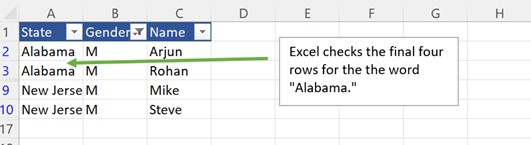
In this example, the difference between 19 rows and 17 rows is so small, you wouldn’t notice a difference in the calculation speed. But imagine the difference in speed for a dataset that’s 100,000 rows or more.
Restructuring Formulas that Use AND or OR Functions
The same principle works for IF statements when using AND or OR.
Take the following example:

We want to write a formula to flag whether an employee is eligible for a retirement package. We can write IF(AND(B2>65, C2>=10), “Yes”, “No”) or IF(AND(C2>=10, B2>65), “Yes”, “No”). Which formula will calculate faster?
Remember that for an AND statement to be TRUE, all the conditions in the AND statement must be true. Excel calculates each condition in an AND statement from left to right. Once Excel finds a condition in an AND statement that is FALSE, it knows the entire statement will be FALSE, and it doesn’t bother calculating the other conditions. The opposite is TRUE for OR statements—as soon as Excel finds a condition is TRUE, it stops calculating the rest of the OR statement.
Put the Condition Most Likely to be FALSE First in the AND statement
Therefore, it is best to put the condition that is most likely to be FALSE first in the AND statement so Excel can exit the statement without needing to calculate the other conditions. For an OR statement, it’s best to put the condition most likely to be TRUE first.
For example, if you look at the data, you’ll notice far fewer employees tend to be over the age of 65 than have at least 10 years of experience. Putting B2>65 as the first part of the AND condition makes Excel find most of the values to be FALSE and causes it not to test the years of service condition.
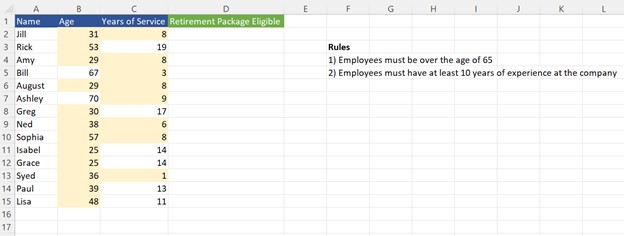
If we test for Age first, Excel can exit out of the AND statement 12/14 times without testing the years of service condition (cells highlighted in gold). If we put the years of service condition first, Excel can exit the AND statement early only 8/14 times (cells highlighted in gold).
Testing for age first saved Excel from calculating four more formulas than years of service. Again, this might only save a few calculations in this example, but the savings grow significantly when the dataset is larger!
Don’t Needless Repeat Calculations for the Same Value
Take a look at the following formula, which calculates the percent of sales generated by each employee.
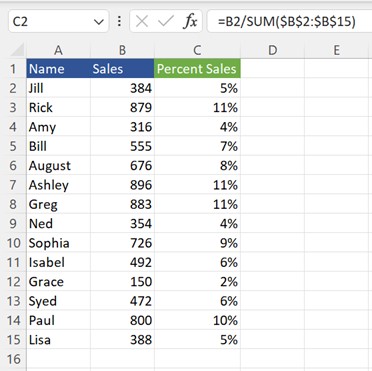
You’ll notice that the denominator of the formula, SUM($B$2:$B$15) appears in every single row. In this case, the denominator is calculated 14 times, even though the result is the same each time.
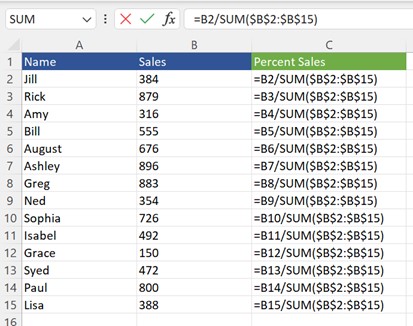
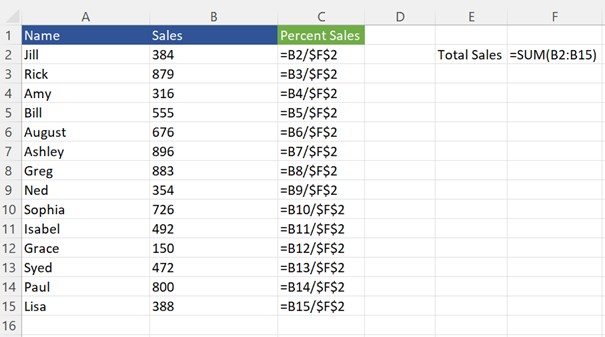
You can save calculation resources by calculating the denominator of the formula once in a separate cell and then referring to that cell in the rest of your formulas. When you delete rows and trigger a recalculation of the workbook, Excel only needs to calculate the sum once instead of 14 times.
Though it may seem like a small matter in this example, imagine if the workbook contained thousands of rows.
Reduce the Number of Formulas in Your Workbook
Remember that Excel crashes when deleting rows because it needs to recalculate formulas. While you can make the formulas in your workbook more efficient, it’s most helpful to eliminate many formulas altogether.
Like most workbooks, you probably get data from an outside source and then paste into a tab of your workbook.
Ask yourself:
- Is there any data I can filter out before it goes into the workbook?
- Am I using my workbook to store data rather than accomplish a specific function?
- Can I break up my workbook into multiple workbooks to avoid making the file size too large for Excel to handle?
- Can I cut out an unnecessary intermediate step in the workbook?
Let’s look at one last example to illustrate the point.
Say your workbook looked like our retirement eligibility example from before.
Instead of exporting a dataset with all your employees, identifying which employees are retirement eligible in Excel, and then performing calculations on those employees, you can see if your company’s software or database can let you export just the retirement employees in the first place.
Most systems should let you filter before exporting. And by filtering ahead of time, you’ll save yourself all those formulas that flag retirement package eligible employees, which, in turn, makes your file less likely to crash when deleting rows.
Conclusion
Remember that Excel crashes when deleting rows because deleting rows triggers a recalculation. Treat the crash like a symptom of a sick workbook rather than the cause itself. By making your workbook more efficient or reducing the amount of data entering the workbook in the first place, you’ll be able to stop your workbook from crashing and delete those pesky rows!